Red Velvet Cake Pops
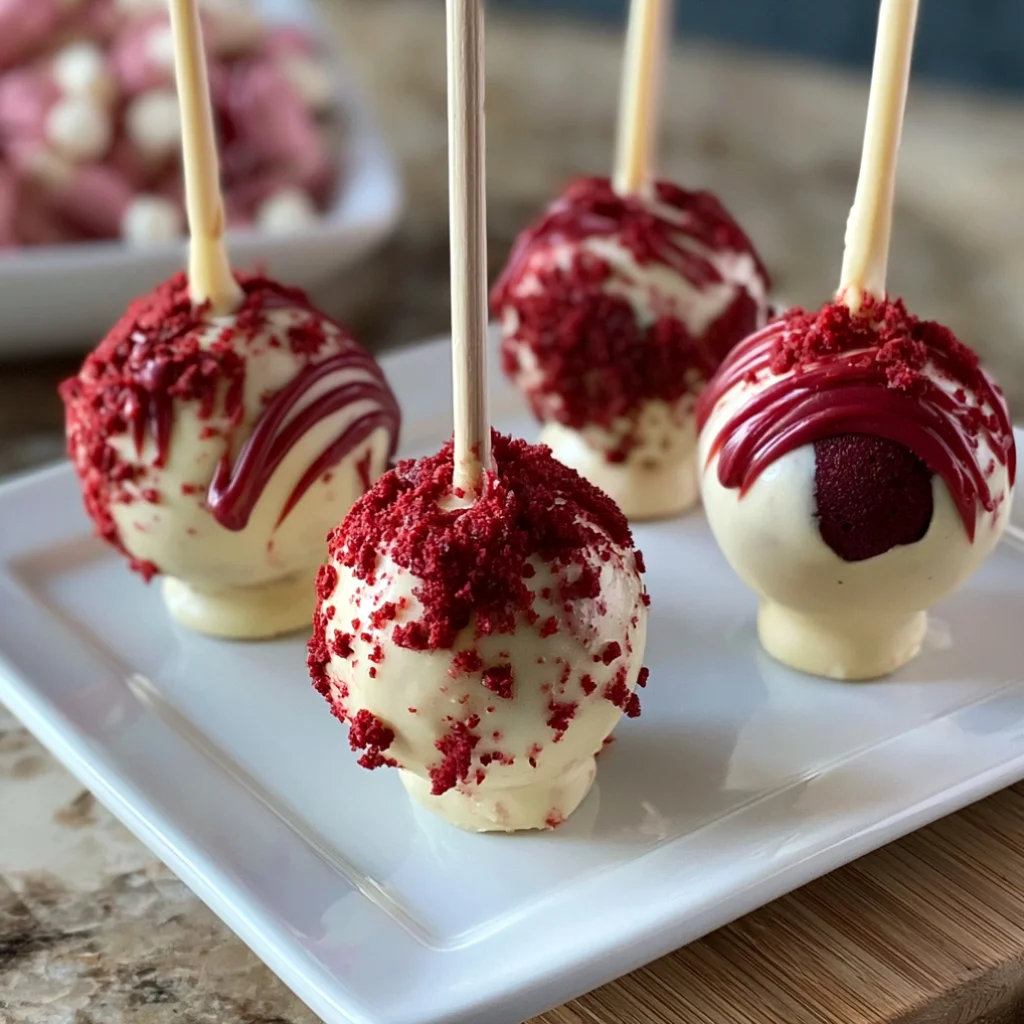
Red Velvet Cake Pops are a delightful twist on the classic red velvet cake, perfect for any occasion. These bite-sized treats are not only visually stunning but also incredibly delicious, blending the rich flavors of cocoa and vanilla with a creamy frosting. Their vibrant red color makes them an eye-catching dessert that will be the star of any dessert table. Whether you’re hosting a party or simply indulging yourself, these cake pops are sure to impress and delight your guests with their rich flavor and delightful texture! Cake pops are not just fun to eat; they also bring a playful element to any gathering, making them a favorite among both kids and adults alike. Plus, their portability means you can easily share them at picnics, birthdays, or even as a sweet treat during movie nights at home!
Ingredients
- For the Cake:
- 1 ½ cups all-purpose flour
- 1 cup granulated sugar
- 1 teaspoon baking soda
- 1 teaspoon salt
- 1 tablespoon unsweetened cocoa powder
- 1 cup vegetable oil
- 1 cup buttermilk, room temperature
- 2 large eggs, room temperature
- 2 tablespoons red food coloring
- 1 teaspoon vanilla extract
- 1 teaspoon white vinegar
- For the Frosting:
- 8 oz cream cheese, softened, for a rich and velvety texture
- ½ cup unsalted butter, softened to room temperature for easy mixing
- 4 cups powdered sugar, sifted to prevent lumps
- 1 teaspoon vanilla extract, for enhancing the flavor
- For Assembly:
- 1 cup chocolate coating (dark or white chocolate), melted for dipping; choose high-quality chocolate for a smoother finish
- Sprinkles (optional), for an extra festive touch, and consider using themed sprinkles for special occasions
- Lollipop sticks, to transform the cake balls into pops; ensure they are sturdy enough to support the pops
Steps / Instructions
- Preheat the Oven: Preheat your oven to 350°F (175°C) and grease a 9×13 inch baking pan with non-stick spray or butter to ensure easy removal of the cake. Make sure to get into the corners of the pan for even baking.
- Mix Dry Ingredients: In a large bowl, whisk together the flour, sugar, baking soda, salt, and cocoa powder until well combined. This helps to evenly distribute the leavening agents and cocoa powder for a consistent texture. The mixture should appear uniform and light.
- Combine Wet Ingredients: In another bowl, mix the vegetable oil, buttermilk, eggs, food coloring, vanilla extract, and vinegar until smooth. The vinegar reacts with the baking soda, giving the cake a light and fluffy texture. This step is crucial for achieving that signature red velvet flavor.
- Combine Mixtures: Gradually add the wet ingredients to the dry mixture, stirring until just combined. Be careful not to overmix, as this can make the cake tough. The batter should be slightly thick but still pourable, with no visible dry flour remaining.
- Bake the Cake: Pour the batter into the prepared baking pan. Bake for 25-30 minutes or until a toothpick inserted in the center comes out clean. The cake should spring back when lightly touched and have a slight dome shape. Let the cake cool completely in the pan on a wire rack, as this will help maintain its moisture.
- Prepare Frosting: While the cake cools, beat the softened cream cheese and butter together in a bowl until creamy and fluffy, about 2-3 minutes. Gradually add the powdered sugar and vanilla extract, mixing until smooth and spreadable. The frosting should be thick yet easily spreadable, ideal for binding the cake crumbs.
- Crumble the Cake: Once the cake is completely cooled, crumble it into a large mixing bowl using your hands or a fork. Aim for fine crumbs to ensure even distribution of frosting. This step is vital for a smooth, cohesive mixture.
- Add Frosting: Add about half of the cream cheese frosting to the crumbled cake and mix until well combined. Add more frosting as needed until the mixture holds together but is not overly wet. The mixture should be moldable but not sticky, allowing for easy shaping of the pops.
- Form Cake Balls: Using your hands, form the mixture into 1-inch balls and place them on a parchment-lined baking sheet. Chill in the refrigerator for at least 30 minutes to firm up, ensuring they’ll hold their shape during dipping. The chilling process is crucial; it helps the cake pops retain their form when coated.
- Melt Chocolate Coating: In a microwave-safe bowl, melt the chocolate coating in 30-second intervals, stirring after each interval until smooth and fully melted. Be cautious not to overheat, as this can cause the chocolate to seize and become unusable.
- Stick the Pops: Dip the end of each lollipop stick into the melted chocolate and insert it into a cake ball. This helps secure the stick in place and prevents it from falling out when dipping. This step ensures stability for your Red Velvet Cake Pops.
- Dip Cake Pops: Once all sticks are inserted, dip each cake pop into the melted chocolate, allowing excess chocolate to drip off. If desired, sprinkle with decorations before the chocolate hardens for a festive appearance. Make sure to rotate the pop slightly for an even coating.
- Set and Serve: Place the finished cake pops upright in a styrofoam block or a decorated container to allow the chocolate to set completely. Once firm, enjoy your delicious Red Velvet Cake Pops with friends and family! These treats are best enjoyed fresh but can also be stored for later enjoyment.
Tips & Tricks
- Ingredient Quality: Use high-quality cocoa powder and pure vanilla extract for the best flavor. Brands like Valrhona or Guittard for cocoa can elevate the taste significantly. This attention to ingredient quality can make a noticeable difference in the final product.
- Make Ahead: You can make the cake and frosting a day ahead. Store the cake in an airtight container and the frosting in the refrigerator until ready to use. This can save time on the day you wish to serve the cake pops, allowing for a smoother baking experience.
- Common Mistakes: Avoid overmixing the cake batter, as this can result in a dense cake. Also, ensure the cake is completely cool before crumbling for the best texture. This allows for more moisture retention and a fluffier cake pop. Patience during these steps pays off!
- Storage: Store the cake pops in an airtight container in the refrigerator for up to a week. They can also be frozen for longer storage; just ensure they’re individually wrapped to prevent freezer burn. Enjoy them chilled for a refreshing treat!
- Melting Chocolate: If the chocolate is too thick for dipping, add a small amount of vegetable oil or Paramount crystals to thin it out. This will give you a smoother coating and a more professional finish. Remember to stir thoroughly to achieve the desired consistency.
Variations
- Flavor Variants: Try adding a hint of almond extract instead of vanilla for a unique twist. Or, incorporate a touch of espresso powder to enhance the chocolate flavor. These small changes can lead to delightful new flavor profiles.
- Dietary Alternatives: For gluten-free Red Velvet Cake Pops, substitute all-purpose flour with a gluten-free flour blend, ensuring it contains xanthan gum for proper texture. This ensures that everyone can enjoy these delicious treats, regardless of dietary restrictions.
Red Velvet Cake Pops
Red Velvet Cake Pops are a delightful twist on the classic red velvet cake, perfect for any occasion. These bite-sized treats are not only visually stunning but also incredibly delicious, blending the rich flavors of cocoa and vanilla with a creamy frosting. Their vibrant red color makes them an eye-catching dessert that will be the star of any dessert table.
Ingredients
- 1 ½ cups all-purpose flour
- 1 cup granulated sugar
- 1 teaspoon baking soda
- 1 teaspoon salt
- 1 tablespoon unsweetened cocoa powder
- 1 cup vegetable oil
- 1 cup buttermilk, room temperature
- 2 large eggs, room temperature
- 2 tablespoons red food coloring
- 1 teaspoon vanilla extract
- 1 teaspoon white vinegar
- 8 oz cream cheese, softened
- ½ cup unsalted butter, softened
- 4 cups powdered sugar, sifted
- 1 teaspoon vanilla extract
- 1 cup chocolate coating, melted
- Sprinkles (optional)
- Lollipop sticks
Directions
Preheat your oven to 350°F (175°C) and grease a 9x13 inch baking pan.
In a large bowl, whisk together the flour, sugar, baking soda, salt, and cocoa powder until well combined.
In another bowl, mix the vegetable oil, buttermilk, eggs, food coloring, vanilla extract, and vinegar until smooth.
Gradually add the wet ingredients to the dry mixture, stirring until just combined.
Pour the batter into the prepared baking pan. Bake for 25-30 minutes or until a toothpick inserted in the center comes out clean.
While the cake cools, beat the softened cream cheese and butter together until creamy. Gradually add the powdered sugar and vanilla extract.
Once the cake is completely cooled, crumble it into a large mixing bowl.
Add about half of the cream cheese frosting to the crumbled cake and mix until well combined.
Using your hands, form the mixture into 1-inch balls and place them on a parchment-lined baking sheet. Chill in the refrigerator for at least 30 minutes.
In a microwave-safe bowl, melt the chocolate coating in 30-second intervals until smooth.
Dip the end of each lollipop stick into the melted chocolate and insert it into a cake ball.
Dip each cake pop into the melted chocolate, allowing excess to drip off. Optionally sprinkle with decorations.
Place the finished cake pops upright in a container to allow the chocolate to set. Enjoy your delicious Red Velvet Cake Pops!
Nutrition Facts
Recipe Reviews
- ★★★★★
Excellent recipe!
Leave a Reply
Your email address will not be published. Required fields are marked *