Red and Green Chicken Enchiladas
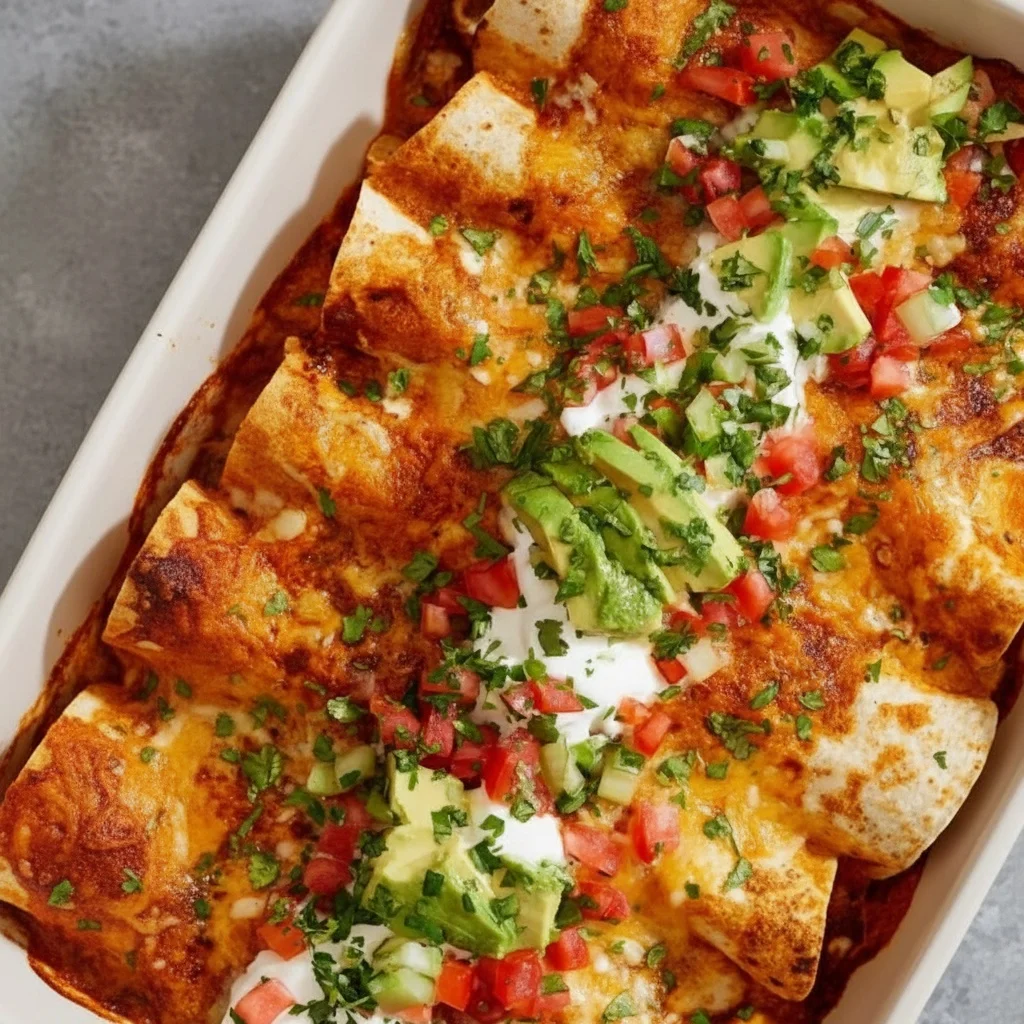
Indulge in the delicious fusion of flavors with our Red and Green Chicken Enchiladas, a quintessential Mexican comfort food that brings together the vibrant flavors of green and red enchilada sauces, succulent shredded chicken, and melted cheese. This dish promises to be a family favorite and is perfect for an easy weeknight dinner. The combination of spices in the chicken filling creates a savory profile that pairs perfectly with the tangy and spicy notes of the enchilada sauces, making every bite a delightful experience.
Ingredients
- For the Chicken Filling:
- 2 cups shredded chicken (rotisserie chicken works well)
- 1 teaspoon ground cumin
- 1 teaspoon garlic powder
- Salt and pepper to taste
- 1 tablespoon olive oil or vegetable oil (to keep the chicken moist)
- Optional: Add a dash of smoked paprika to the chicken for a subtle smokiness that complements the sauces.
- For the Enchilada Sauce:
- 1 cup red enchilada sauce (homemade or store-bought)
- 1 cup green enchilada sauce (homemade or store-bought)
- 1/2 teaspoon smoked paprika (optional, for added depth)
- For a richer sauce, consider adding a tablespoon of tomato paste to enhance the umami flavor.
- Other Ingredients:
- 12 corn tortillas
- 2 cups shredded cheese (Monterey Jack or cheddar)
- 1 cup sour cream
- 1/2 cup chopped cilantro, for garnish
- 1 sliced avocado, for serving (optional)
- 1 lime, cut into wedges (optional, for a citrusy finish)
- Optional: Add thinly sliced jalapeños for a spicy crunch on top before baking.
Steps / Instructions
- Preheat your oven to 375°F (190°C). This ensures that the oven is hot enough to melt the cheese evenly and allows the flavors to meld together beautifully.
- In a mixing bowl, combine the shredded chicken with cumin, garlic powder, salt, pepper, and olive oil. Mix until the chicken is well-coated with the spices. The addition of oil helps in retaining moisture, making the filling juicier. For best results, let the chicken sit for a few minutes to absorb the flavors.
- Warm the tortillas slightly to make them pliable. You can do this by wrapping them in a damp paper towel and microwaving for 30 seconds. Alternatively, you can lightly heat them on a skillet for about 15 seconds on each side. This step is crucial to prevent the tortillas from cracking when rolled.
- Spread a thin layer of the red enchilada sauce on the bottom of a 9×13 inch baking dish. This prevents the enchiladas from sticking and adds an extra layer of flavor. Ensure the sauce covers the entire base of the dish to avoid dry spots.
- Fill each tortilla with a portion of the seasoned chicken and a sprinkle of cheese. Roll them tightly and place them seam-side down in the prepared baking dish. Ensure they are snug so they hold their shape while baking. Arrange the enchiladas in a single layer for even cooking.
- Once all tortillas are filled and placed in the dish, pour the green enchilada sauce over one half and the red enchilada sauce over the other half. This creates a visually appealing contrast and allows for a distinct tasting experience. Use a spoon to ensure the sauce covers each enchilada thoroughly.
- Top generously with the remaining shredded cheese, ensuring an even layer for that perfect melt. You might want to mix different types of cheese for a complex flavor and texture profile.
- Bake in the preheated oven for 20-25 minutes, or until the cheese is melted and bubbly, and the enchiladas are heated through. Look for a slight golden hue on the cheese as a visual cue. If you prefer a crunchy top, broil for the last 2 minutes.
- Remove from the oven and let cool slightly before serving. This allows the sauce to thicken a bit and makes serving easier. Use a thin spatula to carefully lift the enchiladas out of the baking dish.
- Garnish with chopped cilantro and serve with a dollop of sour cream and avocado slices if desired. A squeeze of fresh lime juice can enhance the flavors even more. Consider serving with a side of pickled jalapeños for extra zest.
Tips & Tricks
- Storage Tips: Store leftover enchiladas in an airtight container in the refrigerator for up to 3 days. Reheat in the oven at 350°F (175°C) for about 15 minutes. Ensure they are covered with foil to prevent drying out. For best results, sprinkle a few drops of water over them before reheating.
- Make-Ahead: You can assemble the enchiladas ahead of time, refrigerate them, and bake just before serving. This is perfect for meal prep or entertaining guests. Prepare the sauces a day in advance to save time if you’re in a hurry.
- Common Mistakes: Avoid overfilling the tortillas, as this could cause them to break. Also, ensure the sauces cover the tortillas entirely to prevent them from drying out. If the sauce is too thick, consider thinning it with a little chicken broth. Always taste your sauces and adjust seasoning before assembling the dish.
- Pro Techniques: If possible, use homemade enchilada sauces for the freshest flavor. Toasting the spices before adding them to the chicken can deepen their flavor profile, enhancing the overall taste. For a smoky layer of flavor, grill the chicken before shredding it.
Variations
- Vegan Option: Substitute the chicken with black beans or cooked sweet potatoes, and use a vegan cheese alternative. Incorporating sautéed mushrooms can also add a meaty texture. Consider using coconut yogurt instead of sour cream for a creamy topping.
- Gluten-Free: Ensure your tortillas are gluten-free corn tortillas. Double-check that your sauces do not contain gluten. Use gluten-free flour if you decide to thicken the sauce yourself.
- Spicy Twist: Add jalapeños or chipotle peppers to the chicken filling for an extra kick. Consider using a spicy cheese blend for added heat. You can also drizzle some hot sauce over the top before serving for a fiery finish.
- Cheese Lovers: Use a combination of different cheeses like Oaxaca and crumbled queso fresco for a richer, more authentic taste. Experiment with cheese varieties like pepper jack for a spicy twist or manchego for a nutty flavor.
Serving Suggestions
- Pair these enchiladas with a refreshing Blueberry Breakfast Salad for a vibrant contrast. The sweetness of the salad complements the savory enchiladas perfectly. You could also add a side of roasted corn salad for a touch of sweetness and smokiness.
- Consider serving with a side of Mexican rice or refried beans. The rice can include corn, peas, and diced carrots for added color and nutrition. A side of elote (Mexican street corn) can also be a unique and delicious addition.
- For beverages, a classic margarita or a chilled horchata would complement the flavors beautifully. A light lager or a sweet iced tea can also be excellent choices. Try a refreshing agua fresca made with seasonal fruits for a non-alcoholic option.
- Garnish with extra cilantro, lime wedges, or even pickled red onions for a tangy crunch. A sprinkle of crumbled cotija cheese can also add a salty finish that complements the dish.
FAQ
- Can I use flour tortillas instead of corn? Yes, but corn tortillas are traditional for enchiladas, and they absorb the sauce better without becoming overly soggy. If using flour, consider toasting them lightly to prevent them from becoming mushy. For a gluten-free option, always opt for corn tortillas.
- What if I only have one type of enchilada sauce? You can certainly use just one type; however, using both red and green sauces adds a delightful contrast and depth of flavor. Mixing a bit of salsa with the sauce can add additional layers of taste. Experiment with different brands or homemade recipes to find your preferred flavor profile.
- How do I make homemade enchilada sauce? Homemade sauces involve simmering a blend of tomatoes, spices, and chilies. For detailed recipes, consult a reliable source or a dedicated Mexican cuisine cookbook. Ensure you taste and adjust seasoning during the process for the best results. Consider roasting your vegetables for a deeper flavor before pureeing.
- Can I freeze the enchiladas? Yes, you can freeze the assembled but unbaked enchiladas. Wrap the dish tightly in plastic wrap and aluminum foil, and they can be frozen for up to 2 months. Thaw in the refrigerator overnight before baking. If baking from frozen, add an extra 10-15 minutes to the cooking time, and cover with foil initially to ensure even heating.