2-ingredient dairy-free Watermelon Gelato!
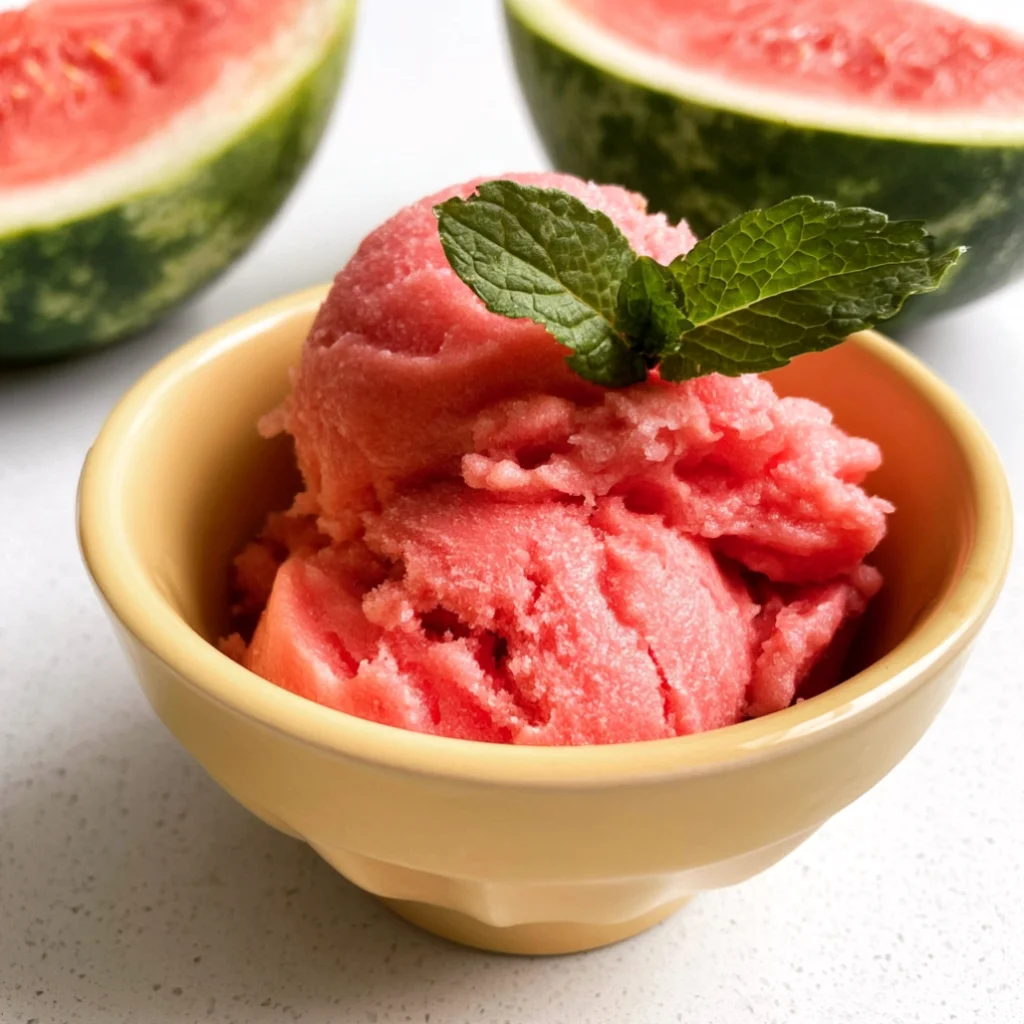
Are you looking for a delightful way to cool off this summer? This dairy-free watermelon gelato is the perfect solution! Made with just two simple ingredients, this refreshing treat is not only vegan but also incredibly easy to make—no ice cream maker required. With its vibrant color and natural sweetness, it’s an excellent option for a healthy dessert that everyone will love. Enjoy this frozen delight as you soak up the sun! This gelato is perfect for barbecues, picnics, or simply enjoying on a hot day, providing a delicious way to stay cool.
Ingredients
- Watermelon: 4 cups of seedless watermelon, cubed (frozen or fresh). Choose ripe watermelon for the best flavor; it should be heavy for its size and have a sweet aroma.
- Natural Sweetener: 2-3 tablespoons of maple syrup or agave nectar (adjust based on sweetness preference). Consider using raw honey if you’re not strictly vegan, and remember that the sweetness of the watermelon can affect the amount needed.
For the best flavor and texture, opt for ripe, sweet watermelon. Make sure the watermelon is free from spots and blemishes. If using frozen watermelon, ensure it’s chopped into small pieces before freezing for easier blending. This allows for a smoother gelato texture, which is key in enjoying your dairy-free watermelon gelato.
Steps / Instructions
- Prepare the Watermelon: If using fresh watermelon, cut it into uniform cubes and place them on a baking sheet. Freeze the cubes for at least 4-6 hours, or until completely solid. This will ensure your gelato has a creamy texture and doesn’t turn watery during blending.
- Blend the Ingredients: Once the watermelon is frozen, add the cubes to a high-speed blender or food processor. Pour in the maple syrup or agave nectar. Blend on high until the mixture is smooth and creamy, roughly 1-2 minutes. You may need to stop and scrape down the sides periodically to ensure everything is well combined. The consistency should be like a soft-serve ice cream—thick and luscious.
- Taste and Adjust: After blending, taste the mixture and adjust the sweetness if necessary. If you prefer a sweeter gelato, add more maple syrup or agave in small increments until you reach your desired taste. This step is crucial, as the sweetness can vary depending on the natural sweetness of the watermelon.
- Transfer to Container: Pour the blended mixture into a freezer-safe container. Smooth the top with a spatula, then cover it with a lid or plastic wrap. Ensure there’s minimal air in the container to prevent ice crystals from forming, which can affect the texture of your gelato.
- Freeze: Freeze the mixture for at least 2-3 hours, or until firm. For a creamier texture, stir the gelato every 30 minutes during the first 2 hours of freezing. This helps keep the gelato smooth and prevents it from freezing too hard.
- Serve: Once fully frozen and firm, scoop the gelato into bowls or cones. Enjoy immediately for the best texture! For an extra touch, use a warm scoop to make serving easier, as it helps glide through the frozen gelato.
Tips & Tricks
- Storage: Store any leftover gelato in an airtight container in the freezer for up to a week. Allow it to sit at room temperature for a few minutes before scooping, as this will soften it slightly and make serving easier.
- Make-Ahead: This gelato can be made a day or two in advance. It’s perfect for summer gatherings or surprise visitors, ensuring you have a delicious dessert on hand without the last-minute rush.
- Avoid Over-Blending: Blend just until smooth to maintain a light and airy texture. Over-blending can cause it to become too liquidy, resulting in a gelato that is not as firm after freezing.
- Common Mistakes: Using overly ripe or soft watermelon can result in a watery gelato. Ensure your watermelon is firm and fresh for the best results, and avoid using any parts that may have started to ferment, as this will alter the taste.
- Pro Techniques: If you want a richer flavor, consider adding a splash of lime juice or a few fresh mint leaves before blending. The lime juice will add a slight tanginess that complements the sweetness of the watermelon beautifully.
Variations
- Flavor Twist: Add a few strawberries or blueberries to the blender for a fruity mix. This not only enhances the flavor but also adds a splash of color to your gelato.
- Herbal Infusion: A sprig of basil or mint added during blending can provide a refreshing herbal note. This can elevate the flavor profile and add a gourmet touch to your dairy-free watermelon gelato.
- Chocolate Drizzle: Serve with a drizzle of dairy-free chocolate syrup for an indulgent touch. This will add a delightful contrast to the sweetness of the watermelon.
- Simple Additions: Toss in a tablespoon of lemon or lime juice for a zesty kick! This can brighten the flavor and make the gelato even more refreshing.
Serving Suggestions
Serve your dairy-free watermelon gelato in chilled bowls or cones for an extra refreshing experience. Top with fresh mint leaves for a vibrant presentation or sprinkle with toasted coconut for added texture. Pair it with a light summer fruit salad or enjoy alongside a refreshing beverage like iced tea or lemonade to enhance the summery vibe. This gelato also makes a fantastic topping for pancakes or waffles during brunch! Check out our related guide for more tips on presentation and serving styles that will impress your guests.
FAQ
- Can I use other fruits? Absolutely! This recipe is versatile; try using frozen mango or pineapple for a tropical twist. You can even mix different fruits for a unique flavor experience.
- What if my watermelon isn’t sweet enough? You can always add more sweetener to taste, or consider blending in a ripe banana for natural sweetness. Ripe bananas not only add sweetness but also enhance the creamy texture of the gelato.
- Can I make this gelato without a blender? While a blender or food processor works best, you can mash the watermelon and sweetener together by hand, though the texture will be different. If doing it by hand, expect a chunkier texture rather than the smooth creaminess of blended gelato.
For more refreshing summer recipes, check out this easy watermelon fruit salad or try these frozen yogurt granola cups for a delightful treat! These options perfectly complement your dairy-free watermelon gelato and provide a variety of flavors for a perfect summer spread!
Dairy-Free Watermelon Gelato
A refreshing treat made with just two simple ingredients, this dairy-free watermelon gelato is perfect for summer and is incredibly easy to make.
Ingredients
- 4 cups of seedless watermelon, cubed (frozen or fresh)
- 2-3 tablespoons of maple syrup or agave nectar
Directions
If using fresh watermelon, cut it into uniform cubes and place them on a baking sheet. Freeze the cubes for at least 4-6 hours, or until completely solid.
Once the watermelon is frozen, add the cubes to a high-speed blender or food processor. Pour in the maple syrup or agave nectar. Blend on high until the mixture is smooth and creamy, roughly 1-2 minutes.
After blending, taste the mixture and adjust the sweetness if necessary.
Pour the blended mixture into a freezer-safe container. Smooth the top with a spatula, then cover it with a lid or plastic wrap.
Freeze the mixture for at least 2-3 hours, or until firm. For a creamier texture, stir the gelato every 30 minutes during the first 2 hours of freezing.
Once fully frozen and firm, scoop the gelato into bowls or cones.
Recipe Reviews
- ★★★★★
Excellent recipe!
Leave a Reply
Your email address will not be published. Required fields are marked *